
Maschine Finger Drumming Configuration
Native Instruments’ Groove Production Studio Maschine
Download the NI Maschine group preset referred to in the video:
XpressPads GM Standard

Maschine Finger Drumming Configuration
There are basically three approaches available when configuring Native Instruments Maschine for finger drumming.
Option one is to run it in MIDI Mode. You get there by pressing “Shift” + “Channel”. It is possible to download the XpressPads finger drumming presets for Maschine in the “presets & layouts” area or you can create a pad layout on your own by using Native Instruments’ Controller Editor software. While this will allow you to use Maschine’s pads to play virtual drum kits that you run in a DAW or stand-alone virtual drum module, it will not permit you to play virtual drums within the Maschine software.
Option two is to manually organize a Maschine “group” for the XpressPads layout. This means you manually assign a kit piece to each and every pad, one at a time, and then save that particular configuration for later use. This does enable you to play virtual drums within the Maschine software, but it is a cumbersome and time-consuming method of preparing Maschine for finger drumming.
It is simpler to just load a group preset, then select a virtual drum module plugin, and finally decide on a preset within the virtual drum module plugin to get started. Option three calls for setting up a group preset within Maschine just once and loading it whenever you want to start playing your own drum grooves.
Maschine Finger Drumming Setup
So, what are the precise steps needed to start Maschine finger drumming?
1) Select an empty group
2) If you are right-handed, press pad 14 (if left-handed, press 15). For more information on why this matters, visit the XpressPads “Getting Started” section or watch the above video.
3) Enter “Plugin Mode” and pick a virtual drum module; in this case, I chose Toontrack’s EZdrummer. Next, link all pads of the group (except pad 14) to the virtual drum module you just loaded into slot 14.
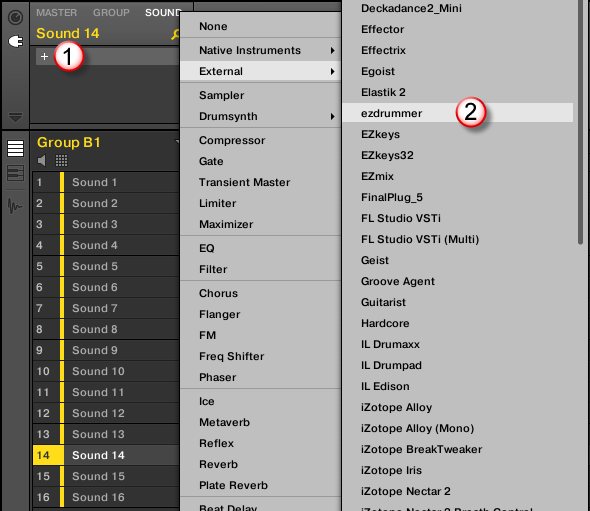
Picking A Plugin In Maschine
4) Enter “Channel Mode,” select “Output” and then select “MIDI” from the right side. While pad 14 is selected, you will see its MIDI settings. It should display the following settings:
a. Destination = none
b. Channel = 14
c. Transpose-knob = center position
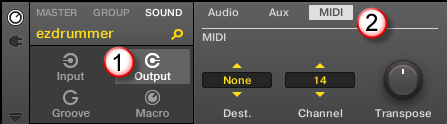
Maschine Output Channel Settings
5) Now select pad 1, which you want as the bass drum of your virtual drum kit. For this pad, you set the following values in the MIDI area of the channel’s output settings:
a. Destination = s14 (that’s the pad where your virtual drum module sits)
b. Channel = 14
c. Transpose-knob = -24 (that’s the MIDI note offset that this pad sends to the virtual drum module in order to trigger the general MIDI kick drum note)
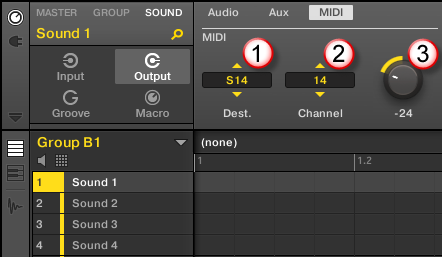
Maschine Pad MIDI Note Transposition
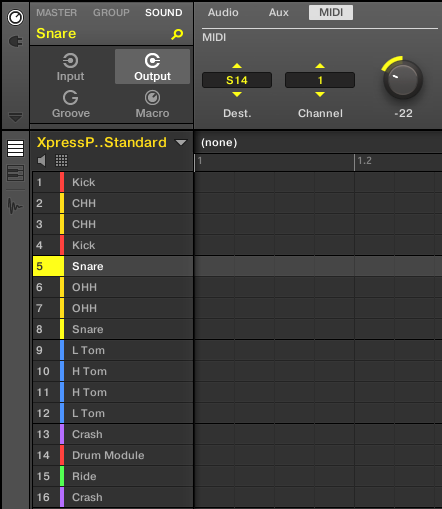
6) Repeat this process for each and every pad and make certain that destination and channel are always the same (s14 & 14). The only thing you need to change for each pad is the transposition value, and there are two ways to do this:
a. Using an XpressPads layout from the “presets & layouts” area of the website, for example, the standard layout, and then derive the correct MIDI transposition value. Those are:
Kick Drum = -24
Snare Drum = -22
Closed HiHat = -18
Open HiHat = -14
High Tom = -13
Floor Tom = -17
Ride Cymbal = -9
Crash Cymbal = -11
b. By ear: Just tune the different drum notes linking to your virtual drum module by turning the transpose knob. Once you found the drum sound you want to move on to each pad in turn.
7) When finished, it might be visually helpful to color the different pads and label them with a meaningful name; then, save the group preset.
Maschine Pad Naming and Coloring
That’s it! You can now experience Maschine finger drumming with the XpressPads technique and never again have to worry about manually (and painstakingly) assembling virtual drum kits in Maschine. Just load the group preset and then a virtual drum kit of your choice in slot 14 (or 15 if you are left-handed), and you can start finger drumming.
While in the virtual drum module that you loaded into slot 14, you can now switch presets as usual and your pads will always trigger the right sounds.
Note: I suggest you check if your virtual drum module supports the General MIDI standard and loads this mapping by default. If it doesn’t, consider changing this in the preferences section of your virtual drum module so that you always get the matched kit piece sounds.
P.S.
If you’d like to furnish feedback on this Maschine finger drumming preparation article and video tutorial, use the “comments” section below or the video commenting functions on YouTube or Google+. We’re interested in your thoughts and in your experience.
If you found this Maschine